Atikh's DBA blog
  • Home
  • Oracle
  • MySQL
  • MongoDB
  • PostgreSQL
  • Snowflake
  • About Me
  • Contact Us

12cR2 New Feature -sql prompt "history"

 Atikh Shaikh     oracle, Oracle 12c, Oracle12cR2 New Feature     No comments   

12cR2 has really great features to use in day to day life for dba. Here we will be discussing one such feature i.e. SQL prompt "history". Many dba's use history command on UNIX prompt to analyze the things or events, Before 12c, this option was not there to see history of sql's you have executed but from 12cR2 onward this is very much possible.
Lets' try this thing out, below is the demonstration 

Check if history parameter is ON/OFF

    SQL> show history; 
    history is OFF

Set history ON

    SQL> set history ON;

    SQL> show history;
    history is ON and set to "100"

Now execute few queries

    SQL> select name,open_mode from v$database;

    NAME      OPEN_MODE
    --------- --------------------
    TECHCDB   READ WRITE

    SQL> show con_id

    CON_ID
    ------------------------------
    1
    SQL> select count(*) from dba_db_links;

      COUNT(*)
    ----------
             2

    SQL> select sysdate from dual;

    SYSDATE
    ---------
    28-JUL-20

 
Now check the history, you will be able see all the sql's executed.

    SQL> history
      1  show history;
      2  select name,open_mode from v$database;
      3  show con_id
      4  select count(*) from dba_db_links;
      5  select sysdate from dual;

    SQL>

set history OFF

    SQL> set history off
    SQL>
    SQL> history
    SP2-1650: History is off, use "SET HIST[ORY] ON" to enable History.

this is use of "history" command. Suppose if you forget to turn off history after your work, don't worry it will be only available for that session, it will be automatically turned off.


Read More
  • Share This:  
  •  Facebook
  •  Twitter
  •  Instagram
  •  Pin
  •  linkedin
  •  reddit

Physical location of datafiles in PostgreSQL

 Atikh Shaikh     PostgreSQL     1 comment   

In this article, we will discuss finding the physical location of data files for a particular database.
In the logical structure, we can see different databases and tables or any other objects under it but as DBA we should also be aware of how to find out the location of data files associated with a database or a table.
In the article table creation in Postgres database we learned to create tables now we use the same tables here to perform a demonstration. Assume we have the below details

Database name- tech_db
Table name - employee

tech_db=# \c tech_db
You are now connected to database "tech_db" as user "postgres".
tech_db=# \dt
          List of relations
 Schema |   Name   | Type  |  Owner
--------+----------+-------+----------
 public | employee | table | postgres
(1 row)

tech_db=# select * from employee;
 emp_id | emp_name | age
--------+----------+-----
    123 | sam      |  25
    124 | John     |  24
(2 rows)

as of now we do not physical location of this database or table, now we will try to find out the same

Read More : Database Creation in PostgreSQL

Data Directory

First of all check data directory using show command

tech_db=# show data_directory;
  data_directory
------------------
 E:/postgres/data
(1 row)

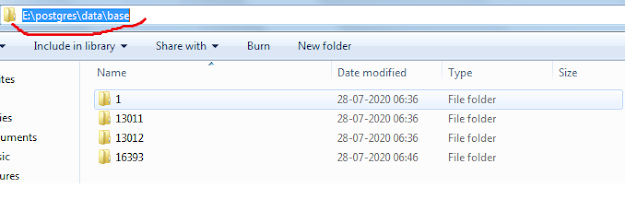
Above we got data directory, as by default folders for each database gets created under data_directory/base location

data-directory-postgresql

as we see folder as created with some random numbers which is called as OID , value of OID can be find using below query.

tech_db=# select datname, oid from pg_database where datname='tech_db';
 datname |  oid
---------+-------
 tech_db | 16393
(1 row) 

we can see value of oid for database tech_db is 16393 and in above screenshot we can find the same folder under base directory. Under it you can find number of files and now lets find the file related to our table employee

tech_db=# select relname,oid, relfilenode from pg_class where relname='employee';
 relname  |  oid  | relfilenode
----------+-------+-------------
 employee | 16394 |       16394
(1 row)

pick up the relfilenode from above output, you will be able to see same file under folder 16393

physical-location-of-datafile-in-postgresql


Read More
  • Share This:  
  •  Facebook
  •  Twitter
  •  Instagram
  •  Pin
  •  linkedin
  •  reddit

Basic Operations on MySQL Users

 Atikh Shaikh     mysql     No comments   

In this article we are going to discuss about different operations on mysql user like lock, unlock, grant, revoke etc.

  • Lock-unlock
  • Expire-unexpired
  • Check privileges
  • Revoke privileges
  • Change password
  • Rename user (single user, multiple user)
  • Drop user
User list can be fetched using query mentioned below in the database

select user,host,authentication_string,password_expired,account_locked from user where user like 'test%';

We can all accounts are unlocked and password not expired. We will perform operations one by one


LOCK and UNLOCK

Let’s lock and unlock test@%
Locking the account
    alter user ‘test’@’%’ account lock;
Checking the status
    select user,host,authentication_string,password_expired,account_locked from user where user like 'test%';

Unlocking it again
    alter user ‘test’@’%’ account unlock;

This will affect only test@% not test@localhost, both are different users.


EXPIRE

Let’s expire password for 'test'@'localhost' and revert it
alter user ‘test’@’localhost’ password expire;

Verification
    select user,host,authentication_string,password_expired,account_locked from user where user like 'test%';

Password reset using values
    alter user ‘test’@’localhost’ identified with ‘mysq_native_password’ as   ‘*5BA7FD292EB16719F76792ECAF589CE4B62CCC94’;


Verifying status again
    select user,host,authentication_string,password_expired,account_locked from user where user like 'test%';


CHECK PRIVILEGES
show grants for ‘test2’@’locahost’;


REVOKE PRIVILEGES
In below example grants of test2@localhost has been revoked
show grants for ‘test2’@’localhost’;
revoke SELECT, INSERT, DELETE CREATE, DROP, RELOAD, ALETER ON *.* from ‘test2’@’localhost’;
flush privileges;
show grants for ‘test2’@’localhost’;


CHANGING PASSWORD
In below example password of test3@% has been altered.
select user, host, authentication_string, password_expired, account_locked from user where user like 'test%';
alter user ‘test3’@’%’ identified by ‘Hudrt#12’;
select user, host, authentication_string, password_expired, account_locked from user where user like 'test%';


RENAME USER
show grants for ‘test1’@’localhost’;

Single user 

In mysql we can rename the user without dropping it but modification needs to be carried wherever it is not getting used, grants will not get altered

Single user- in below example ‘test1’@’localhost’ user has been renamed with ‘xyz1’@’localhost’

rename user ‘test1’@’localhost’ to ‘xyz1’@’localhost’;
show grants for ‘xyz1’@’localhost’;
select user, host, authentication_string, password_expired, account_locked from user where user like xyz1%';


Multiple user
select user, host, authentication_string, password_expired, account_locked from user where user like 'test%';
rename user ‘test’@’localhost’ to ‘abc’@’%’,
            ‘test’@’%’ to ‘abc’@’localhost’;
select user, host, authentication_string, password_expired, account_locked from user where user like 'test%';
select user, host, authentication_string, password_expired, account_locked from user where user like 'abc%';


DROP USER
In below example we are dropped abc user
select user,host from user where user=’abc’;
drop user ‘abc’@’localhost’;
select user,host from user where user=’abc’;
drop user  ‘abc’@’%’;
select user,host from user where user=’abc’;

Read More
  • Share This:  
  •  Facebook
  •  Twitter
  •  Instagram
  •  Pin
  •  linkedin
  •  reddit

Oracle : STATISTICS_LEVEL parameter

 Atikh Shaikh     oracle, Performance     No comments   

In Oracle as we gather and view statistics though different views or tables can be controlled by instance level parameter STATISTICS_LEVEL
This particular parameter has below three possible settings

  • BASIC
  • TYPICAL
  • ALL
The parameter controls automatic gathering of statistics at two levels 
Instance statistics : statistics accumulate withing instance regarding activity
Object statistics : stats accumulated on objects within database

The instance statistics accumulated in memory and flushed to AWR ( automatic workload repository) by MMON (manageability monitor) background process
Object statistics are gathered by DMBS_STATS procedure calls

Now we will discuss about parameter setting 

TYPICAL : The default setting is TYPICAL, this setting will gather all statistics needed by self management and tuning capabilities of the database and will also enable automatic object analysis task that runs daily in maintenance window

BASIC: The BASIC setting disable  AWR statistics and disable daily analysis
ALL : ALL setting gathers all possible statistics, these include operating system statistics and very detailed statistics on SQL statement execution. This shortcoming with this method is it will impact performance adversely.

Suggestion : this parameter should always be kept default and of ALL setting is required should be kept for short term.

This parameter can be altered runtime using simple alter system command

alter system set STATISTICS_LEVEL= BASIC;
alter system set STATISTICS_LEVEL= TYPICAL;
alter system set STATISTICS_LEVEL= ALL;

and same can be viewed using

show parameter  STATISTICS_LEVEL

Read More
  • Share This:  
  •  Facebook
  •  Twitter
  •  Instagram
  •  Pin
  •  linkedin
  •  reddit

Transferring file from one server to another server [FTP, SFTP, SCP etc]

 Atikh Shaikh     MongoDB, mysql, oracle, Oracle 12c, PostgreSQL     No comments   

There are number of ways to transfer file from one server to another server, below are the few methods to to achieve the same

  1. ftp
  2. sftp
  3. scp
  4. windows software (Filehippo, WinScp , FileZilla etc)
We will discuss these in details

1. FTP transfer

File Transfer Protocols basically is set of rules on computer network to communicate with one another. This FTP tool or utility can be used to transfer files from one server to another server.
Below are the commands to use ftp
$ftp
User : 
Password :
ftp> bin  -- to transfer in binary format
ftp> cd
ftp> put/get -- put for sending from one server to another and get is vice versa
ftp>bye


2. SFTP transfer

As name suggest SFTP is secure file transfer protocol, it uses full security and authentication functionality of SSH. SFTP is new utility compared to FTP and recommended to use instead of FTP
This utility can be used using below commands
$sftp @
password : ***
sftp>cd
sftp> put/get -- put for sending from one server to another and get is vice versa
sftp> bye


3.SCP 

SCP is used for securely copying files from one server system to another server system. 
Below is syntax for the same

scp [OPTION] [user@]src_server:] file1 [user@]target_server:]file2
where 
[user@]src_server:] file1 -- source file
[user@]target_server:]file2 -- destination file

for example
scp text_file.txt  @:/


4. Windows software

There are number of freely available software on internet, choose your favourite one and transfer files using simple GUI
Below are few I came across

  • FileZilla
  • Filehippo
  • WinScp
  • FireFTP

Read More
  • Share This:  
  •  Facebook
  •  Twitter
  •  Instagram
  •  Pin
  •  linkedin
  •  reddit
Newer Posts Older Posts Home

Author

Atikh Shaikh
View my complete profile

Categories

  • MongoDB (18)
  • Oracle 12c (30)
  • Oracle12cR2 New Feature (3)
  • PostgreSQL (20)
  • RMAN (10)
  • Snowflake (8)
  • mysql (23)
  • oracle (74)

Blog Archive

  • ►  2018 (38)
    • ►  November (25)
    • ►  December (13)
  • ►  2019 (33)
    • ►  January (15)
    • ►  February (6)
    • ►  March (2)
    • ►  April (5)
    • ►  May (5)
  • ▼  2020 (5)
    • ►  April (1)
      • Transferring file from one server to another serve...
    • ►  May (2)
      • Oracle : STATISTICS_LEVEL parameter
      • Basic Operations on MySQL Users
    • ▼  July (2)
      • Physical location of datafiles in PostgreSQL
      • 12cR2 New Feature -sql prompt "history"
  • ►  2021 (8)
    • ►  June (3)
    • ►  July (3)
    • ►  August (1)
    • ►  December (1)
  • ►  2022 (33)
    • ►  May (3)
    • ►  June (10)
    • ►  July (3)
    • ►  August (4)
    • ►  September (8)
    • ►  October (3)
    • ►  November (2)
  • ►  2023 (14)
    • ►  February (1)
    • ►  April (5)
    • ►  May (2)
    • ►  June (1)
    • ►  September (1)
    • ►  October (1)
    • ►  December (3)
  • ►  2024 (5)
    • ►  January (2)
    • ►  March (3)
  • ►  2025 (6)
    • ►  March (1)
    • ►  April (3)
    • ►  May (2)

Popular Posts

  • ORA-29283: invalid file operation: unexpected "LFI" error (1509)[29437]
    I was trying to export the schema in my windows PC, it got stuck with below error    C:\Users\shaik\Videos\technodba exp>expdp userid...
  • PostgreSQL : How to get data directory location for PostgreSQL instance
    Sometimes, you start working on a PostgreSQL instance but forget about the data directory, here we will discuss different methods to know th...
  • Oracle 23ai : Use of NOVALIDATE Constraints in IMPDP
    While performing impdp operations in the Oracle database, Oracle performs validation checks for every constraint on the imported table, that...
  • ERROR 1221 (HY000): Incorrect usage of DB GRANT and GLOBAL PRIVILEGES
    In previous articles, we have learned about user creation and grants  in MySQL in detail, but there are a few privileges called global priv...
  • Oracle Dataguard Broker Configuration (DGMGRL)
    Data Guard Broker is a command-line interface that makes managing primary and standby databases easy. DBA can use a single command to switch...

Labels

oracle Oracle 12c mysql PostgreSQL MongoDB oracle 19c Oracle23c oracle19c Orale PDB-CDB oracle12c python AWS Oracle ASM Virtualbox pluggable database storage engine

Pages

  • Disclaimer
  • Privacy Policy

Follow TechnoDBA

Copyright © Atikh's DBA blog | Powered by Blogger