Atikh's DBA blog
  • Home
  • Oracle
  • MySQL
  • MongoDB
  • PostgreSQL
  • Snowflake
  • About Me
  • Contact Us

CRUD (Create, Read, Update, Delete) Operations in MongoDB

 Atikh Shaikh     MongoDB     No comments   

In previous articles, we have talked about installation, database, collection, and document, now we will learn to perform basic CRUD operations on Documents in MongoDB

Create Document

Creating a document refers to inserting a document in the collection, let’s see how it happens
Considering we are creating records for employees, we are going to insert below two documents in the employee collection

({"empid" : "1234","empname" : "Rajesh", "empunit": "Finance"})

({"empid" : "1235","empname" : "Mani", "empunit" : "HR"})


Read Document


Now we will see how to pull this data from collection, we have a function 
db.<collection>.find()


We can use different versions of find function 
i.e.
db.<collection>.find() : finds all documents in collection
db.<collection>.findOne() : find single document
db.<collection>.find(<condition>) : find particular document/s which satisfies condition

Updating Document


Definition of the update remains same as oracle update definition, i.e. setting up new value to attribute or parameter
let’s update the empname of an employee having id 1234 to Ramesh, so the query will be

db.employee.update ({"empid" : "1234"}, {$set: {"empname" : "Ramesh"}});


Delete Document


Syntax for deleting of document from collection is db.<collection>.remove()
let’s try deleting employee with empid 1235


We can see the entry is deleted. Similar way we can execute db.<collection>.remove() without any condition in a bracket to remove all the documents in the collection.

[Aslo read- Introduction to Mongodb]
Read More
  • Share This:  
  •  Facebook
  •  Twitter
  •  Instagram
  •  Pin
  •  linkedin
  •  reddit

Databases, Collections and Documents in MongoDB

 Atikh Shaikh     MongoDB     No comments   

As discussed in the previous post we learned to install and connect to MongoDB from the command line
In this post will go ahead with creating a Database, Collection, and Documents and perform different operations in MongoDB

mongodb-database-collection-documents

Create Database

Connect to MongoDB on the command line by using the "mongo" command
Creating a mongo database is just like creating a directory structure, in the below example I have created a database named "techon_db"
Below screenshot will show the steps

mongodb-create-database

We can see "use " command will be able to create a database and same way we can switch to another database as well
"db" command will show the current db and show dbs will list all the databases present in an instance with some data in it. The empty database will not be shown here.

Drop Database

In the similar way, dropping of db is very simple, just invoke db.dropDatabase(); from the database, you want to drop

> use mydb
switched to db mydb
> db.dropDatabase ();
{ "ok" : 1 }

Create Collection


As mentioned Introduction of MongoDB, the collection is analogous to a table in RDMBS and is created using BSON (binary JSON) coding, here we will create a simple collection under our recently created db "techon_db"
There is a couple of ways to do it.

1. Using db.createCollection ("collectionname")

I have created a collection with the name "techon_col" and you can see the same as shown below 

>use techon_db;
switched to db techon_db
> 
>show collections;
> 
>db.createCollection ("techon_col");
{"ok" : 1 }
>show collections;
techon_col

2. By inserting documents in collection


In the below example, we are creating collection techon_col1 and inserting documents in it. This method performs both steps within a single command. It will automatically create a collection and insert a document in it

>show dbs;
admin      0.000GB
config     0.000GB
local      0.000GB
techon_db  0.000GB
> 
>db
techon_db
>show collections;
techon_col
> 
>db.techon_col1.insert({name: "John"});
WriteResult({"nInserted" : 1 })
> 
>show collections;
techon_col
techon_col1

Dropping Collection


In the below example I have dropped collection techon_col1.

>show collections
techon_col
techon_col1
>db.techon_col1.drop();
true
>show collections
techon_col

Insert and Remove Documents


Now we will try to insert data in collection techon_col, first, check if it has any data in it using find ()

>use techon_db
switched to db
techon_db
>show collections;
techon_col
techon_col1
>db.techon_col1.find();
{"_id" : ObjectId("5bfa6a9a131a6cd76ed5cd4c"),"name" : "John" }
>db.techon_col.find();
>

We can see there is no document in the techon_col collection

Below I have added two documents in the collection with three attributes 
Rno,
firstname and 
lastname. 
"_id" is the default attribute generated by MongoDB,it will work as primary key

db.techon_col.find();
> 
>db.techon_col.insert({"Rno":"10",
"firstname":"Mark",
"lastname":"steve"});
WriteResult({"nInserted" : 1 })
> 
>db.techon_col.insert({"Rno":"11",
"firstname":"Dave",
"lastname":"john"});
WriteResult({"nInserted" : 1 })
> 
>db.techon_col.find();
{"_id" : ObjectId("5bfa7162131a6cd76ed5cd4f"),
"Rno" : "10", "firstname" : "Mark",
"lastname" : "steve" }
{"_id" : ObjectId("5bfa718a131a6cd76ed5cd50"),
"Rno" : "11", "firstname" : "Dave",
"lastname" : "john" }
>

Removing Document


In below example I have removed document with Rno 10

>db.techon_col.remove({"Rno":"10"});
WriteResult({"nRemoved" : 1 })
>db.techon_col.find();
{"_id" : ObjectId("5bfa718a131a6cd76ed5cd50"),
"Rno" : "11", "firstname" : "Dave",
"lastname" : "john" }
>

Here is the summary screenshot of activities we have performed
[Also read - CRUD operations in Mongodb]


In case you want to check basics of MongoDB, Visit Introduction to MongoDB

Read More
  • Share This:  
  •  Facebook
  •  Twitter
  •  Instagram
  •  Pin
  •  linkedin
  •  reddit

Oracle DBA Scripts

 Atikh Shaikh     oracle     8 comments   


Below are some Oracle scripts used in day to day activities note that below script will generate sql statements and then we need to run those statements

Script to capture object level privileges for schema

set head off
set verify off
set feedback off
set echo off
Select 'grant '||privilege||' on '||owner||'."'||table_name||'" to '||grantee||';' from dba_tab_privs where grantor in ('&SCHEMA_NAME');

Script to capture system level privileges for schema

select 'grant '||privilege||' to '||grantee||';' from dba_sys_privs where grantee in ('&SCHEMA_NAME');

Compile INVALID objects in particular schema

select 'alter '||object_type||' ' ||owner||'.'||object_name||' compile;' from dba_objects where status='INVALID' and owner in (‘&SCHEMA_NAME’);

To refresh SELECT Role

select 'Grant select on &SCHEMA_NAME.'||object_name|| ' to SELECT_ROLE_NAME;' from dba_objects where owner='&SCHEMA_NAME' and object_type in ('TABLE','VIEW','SYNONYM','MATERIALIZED VIEW');

To refresh UPDATE role

select 'Grant insert,update,delete on SCHEMA_NAME.'||object_name|| ' to UPDATE_SCHEMA_NAME;' from dba_objects where owner=’SCHEMA_NAME' and object_type in ('TABLE','VIEW','SYNONYM','MATERIALIZED VIEW')
union
select 'Grant execute on SCHEMA_NAME.'||object_name|| ' to UPDATE_ROLE_NAME;' from dba_objects where owner='SCHEMA_NAME' and object_type in ('PROCEDURE','FUNCTION','PACKAGE');

To Enable and Disable constraints on a table

select 'alter table ' || owner || '.' ||'"'|| TABLE_NAME||'"'|| ' disable constraint ' ||'"'|| CONSTRAINT_NAME ||'"'|| ';' from dba_constraints where OWNER='SCHEMA_NAME';

select 'alter table ' || owner || '.' ||'"'|| TABLE_NAME||'"'|| ' enable constraint ' ||'"'|| CONSTRAINT_NAME ||'"'|| ';' from dba_constraints where OWNER='SCHEMA_NAME';

To truncate tables of a schema

select 'truncate TABLE ' ||owner||'.'||object_name||';' from dba_objects where owner='SCHEMA_NAME' and object_type='TABLE'  order by 1 desc;

To kill the sessions

db Level
select 'alter system kill session '''||sid ||','||serial#||''';' from v$session where sid in (2331,1552,261);

OS level
select 'kill -9 '||p.spid from v$session s, v$process p where s.paddr=p.addr and s.sid in (2331,1552,261);

Synonym creation on all the tables of particular schema

select 'create synonym '||object_name||' for ' ||owner||'.'||object_name||';' from dba_objects where owner in ('SCHEMA_NAME') and object_type in ('TABLE');


I will keep this article updated with new scripts. Keep eye on this.
Read More
  • Share This:  
  •  Facebook
  •  Twitter
  •  Instagram
  •  Pin
  •  linkedin
  •  reddit

Installation of MongoDB on Windows

 Atikh Shaikh     MongoDB     No comments   

Below are steps to install the MongoDB instance, make you download it from the official website 
https://www.mongodb.com/download-center, In the below example we are installing MongoDB version 3.6.5.

Please check this for Introduction to MongoDB


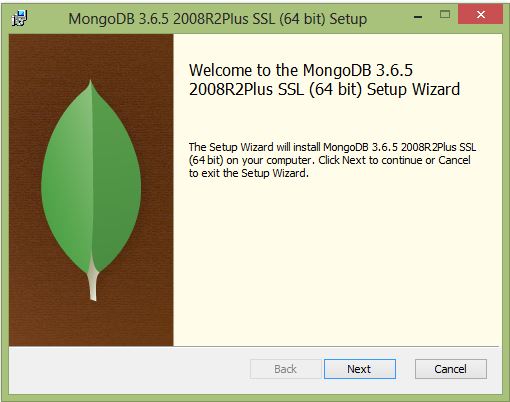
Step 1: “Welcome window" Click Next

                         Download and Install mongodb windows

Step 2: Accept the License Agreement and click Next

                          Download and Install mongodb windows

Step 3: Select complete and Click Next

                         Download and Install mongodb windows

Step 4: Uncheck “Install MongoDB Compass" and click Next
            If you want to install MongoDB Compass click Next


                              Download and Install mongodb windows

Step 5: Click "Install" to start the installation


Step 6: Installation will be completed within few minutes

                           Download and Install mongodb windows


This is the complete installation of MongoDB on windows

Start Daemon process and login to MongoDB instance

Create directory D:\mongodb\data\db in your system and open command prompt and change the directory location to executable of MongoDB C:\Program Files\MongoDB\Server\3.6\bin
Below windows shows the mongod process is started 


Now open another instance of command prompt and set the directory to same as mentioned above and execute mongo, it will  go to mongodb prompt
execute "show dbs" command to check databases 


[Also read Introduction to MongoDB]
Read More
  • Share This:  
  •  Facebook
  •  Twitter
  •  Instagram
  •  Pin
  •  linkedin
  •  reddit

Installation of PostgreSQL 9.6 on Windows

 Atikh Shaikh     PostgreSQL     No comments   

Before starting the installation decide which version you want to install. In below example we are installing 9.6.11
go to official website of PostgreSQL to download required version
https://www.postgresql.org/download/windows/
once downloaded unzip the file and start the installation by clicking setup.exe 

You may like to see Introduction to PostgreSQL before installation 

Installation of PostgreSQL


Step 1: Welcome window, click Next

   techondba-postgresql-installation-step-1


Step 2: Select installation directory and click Next

             techondba-postgresql-installation-step-2


Step 3: Select data directory and click Next


   techondba-postgresql-installation-step-3


Step 4: Enter password for super user and click Next

    techondba-postgresql-installation-step-4


Step 5: Select port number and click Next


   techondba-postgresql-installation-step-5


Step 6: Select advanced option and keep [Default Locale] and click Next


techondba-postgresql-installation-step-6


Step 7: Next window will be "Ready to Install" click Next then Installation will begin and this will take few minutes

   techondba-postgresql-installation-step-7


Step 8: Once installation is finished, below window will appear, uncheck "Launch Stack Builder at Exit"  and click Finish
      techondba-postgresql-installation-step-8


You have finished installation successfully

Verification of installation


Step 1:  Search for pgAdmin 4 on your computer and click on it

techondba-postgresql-verification-step-1


Step 2: Below window will appear and it will start postgre in next window

techondba-postgresql-verification-step-2


Step 3: Click PostgreSQL 9.6 present on left side and enter required password and click OK
 
techondba-postgresql-verification-step-3
   

Step 4: We will able to see all the objects, verification is completed successfully.

techondba-postgresql-verification-step-4


All the best, enjoy play with PostgreSQL, keep checking this space, more will be coming on PostgreSQL, MongoDB. 

Please visit Introduction to PostgreSQL, Introduction to MongoDB
Read More
  • Share This:  
  •  Facebook
  •  Twitter
  •  Instagram
  •  Pin
  •  linkedin
  •  reddit
Newer Posts Older Posts Home

Author

Atikh Shaikh
View my complete profile

Categories

  • MongoDB (18)
  • Oracle 12c (30)
  • Oracle12cR2 New Feature (3)
  • PostgreSQL (20)
  • RMAN (10)
  • Snowflake (8)
  • mysql (23)
  • oracle (73)

Blog Archive

  • ▼  2018 (38)
    • ▼  November (25)
      • Introduction On MySQL
      • SQL Modes in MySQL
      • MySQL Version explained
      • MySQL Storage Engines (Part 1)
      • MySQL Storage Engines (Part 2)
      • Login to MySQL Database on Linux
      • Error Code: 1419. You do not have the SUPER privil...
      • Create MySQL database on Linux
      • Create New User in MySQL Database
      • MySQL Default database | MySQL System Database
      • Oracle ASM Basic Commands
      • Oracle Database Schema Refresh
      • Create User in Oracle Database Pre-12c and 12c
      • RMAN Disk backup and List or Report RMAN Backup
      • RMAN Backup of Single Datafile and List Backup
      • Difference Between User, Service account and Schem...
      • Create MySQL Database Backup | mysqldump mysqlbackup
      • Switching between ARCHIVELOG Mode and NOARCHIVELOG...
      • Introduction to MongoDB
      • Introduction to PostgreSQL
      • Installation of PostgreSQL 9.6 on Windows
      • Installation of MongoDB on Windows
      • Oracle DBA Scripts
      • Databases, Collections and Documents in MongoDB
      • CRUD (Create, Read, Update, Delete) Operations in ...
    • ►  December (13)
  • ►  2019 (33)
    • ►  January (15)
    • ►  February (6)
    • ►  March (2)
    • ►  April (5)
    • ►  May (5)
  • ►  2020 (5)
    • ►  April (1)
    • ►  May (2)
    • ►  July (2)
  • ►  2021 (8)
    • ►  June (3)
    • ►  July (3)
    • ►  August (1)
    • ►  December (1)
  • ►  2022 (33)
    • ►  May (3)
    • ►  June (10)
    • ►  July (3)
    • ►  August (4)
    • ►  September (8)
    • ►  October (3)
    • ►  November (2)
  • ►  2023 (14)
    • ►  February (1)
    • ►  April (5)
    • ►  May (2)
    • ►  June (1)
    • ►  September (1)
    • ►  October (1)
    • ►  December (3)
  • ►  2024 (5)
    • ►  January (2)
    • ►  March (3)
  • ►  2025 (5)
    • ►  March (1)
    • ►  April (3)
    • ►  May (1)

Popular Posts

  • ORA-29283: invalid file operation: unexpected "LFI" error (1509)[29437]
    I was trying to export the schema in my windows PC, it got stuck with below error    C:\Users\shaik\Videos\technodba exp>expdp userid...
  • Oracle Dataguard Broker Configuration (DGMGRL)
    Data Guard Broker is a command-line interface that makes managing primary and standby databases easy. DBA can use a single command to switch...
  • ERROR 1221 (HY000): Incorrect usage of DB GRANT and GLOBAL PRIVILEGES
    In previous articles, we have learned about user creation and grants  in MySQL in detail, but there are a few privileges called global priv...
  • PostgreSQL : How to get data directory location for PostgreSQL instance
    Sometimes, you start working on a PostgreSQL instance but forget about the data directory, here we will discuss different methods to know th...
  • Oracle 23ai : The all new Hybrid Read-Only for pluggable databases (PDBs)
      The latest Oracle database version, Oracle 23ai, introduced a new open mode called Hybrid Read-Only for pluggable databases (PDBs). Local ...

Labels

oracle Oracle 12c mysql PostgreSQL MongoDB oracle 19c Oracle23c oracle19c Orale PDB-CDB oracle12c python AWS Oracle ASM Virtualbox pluggable database storage engine

Pages

  • Disclaimer
  • Privacy Policy

Follow TechnoDBA

Copyright © Atikh's DBA blog | Powered by Blogger