Atikh's DBA blog
  • Home
  • Oracle
  • MySQL
  • MongoDB
  • PostgreSQL
  • Snowflake
  • About Me
  • Contact Us

Create Pluggable Database (PDB) in Oracle 12c

 Atikh Shaikh     oracle, Oracle 12c     No comments   


We have gone through features of 12c Multitenant database. Now we will have discussion on create pluggable databases (PDB). There are different ways to create pluggable database
We will discuss on below methods

1. Using SEED pdb
2. Using XML file
3. By Cloning
     a. Local PDB
     b. Remote PDB

Using seed PDB PDB$SEED

Below are steps to create PDB using PDB$SEED, first Check the PDB's available in container database


SQL> show pdbs

    CON_ID CON_NAME                       OPEN MODE  RESTRICTED
---------- ------------------------------ ---------- ----------
         2 PDB$SEED                       READ ONLY  NO
         3 PDB_1                          READ WRITE NO

Now create PDB using below command, note that we have provided options to create admin user, default tablespaces and roles. FILE_NAME_CONVERT is required in case mount point or diskgroups are different, for understanding purpose we used in below example though diskgroup is same.

SQL> create pluggable database pdb_techon admin user techon_admin identified by techon#123 roles = (DBA)
default tablespace techon_tbs datafile '+DATA01' size 100M
FILE_NAME_CONVERT=('+DATA01','+DATA01');  2    3

Pluggable database created.

We can see PDB is default created in MOUNTED state. we need to open the same with alter pluggable database command as shown below

SQL>  show pdbs

    CON_ID CON_NAME                       OPEN MODE  RESTRICTED
---------- ------------------------------ ---------- ----------
         2 PDB$SEED                       READ ONLY  NO
         3 PDB_1                          READ WRITE NO
         4 PDB_TECHON                     MOUNTED
SQL>
SQL> alter pluggable database PDB_TECHON open;

Pluggable database altered.

SQL> show pdbs

    CON_ID CON_NAME                       OPEN MODE  RESTRICTED
---------- ------------------------------ ---------- ----------
         2 PDB$SEED                       READ ONLY  NO
         3 PDB_1                          READ WRITE NO
         4 PDB_TECHON                     READ WRITE NO

We can check datafile created for tablespace techon_tbs

SQL> select name from v$datafile where name like '%tech%';

NAME
---------------------------------------------------------------
+DATA01/DEV12C1/TECHON_PDB/DATAFILE/techon_tbs.363.994818875


Using XML file

For carrying out this activity, I have created .xml file of our previous PDB, techno_pdb and dropped it using keep datafile option and generated xml file for the same

SQL> show pdbs

    CON_ID CON_NAME                       OPEN MODE  RESTRICTED
---------- ------------------------------ ---------- ----------
         2 PDB$SEED                       READ ONLY  NO
         3 PDB_1                          READ WRITE NO
         4 PDB_TECHON                     READ WRITE NO

SQL> alter pluggable database PDB_TECHON close;

Pluggable database altered.

SQL> show pdbs

    CON_ID CON_NAME                       OPEN MODE  RESTRICTED
---------- ------------------------------ ---------- ----------
         2 PDB$SEED                       READ ONLY  NO
         3 PDB_1                          READ WRITE NO
         4 PDB_TECHON                     MOUNTED

SQL> alter pluggable database PDB_TECHON unplug into '/u01/pdb_backup/pdb_techon.xml';

Pluggable database altered.

SQL> drop pluggable database PDB_TECHON keep datafiles;

Pluggable database dropped.

SQL> show pdbs

    CON_ID CON_NAME                       OPEN MODE  RESTRICTED
---------- ------------------------------ ---------- ----------
         2 PDB$SEED                       READ ONLY  NO
         3 PDB_1                          READ WRITE NO
SQL>

Now lets see command to create PDB from xml file, as we have kept datafiles as it is during drop no file_name_convert or transfer of any datafile is required

SQL> Create pluggable database PDB_TECHON using '/u01/pdb_backup/pdb_techon.xml’;

Pluggable database created.

SQL> show pdbs

    CON_ID CON_NAME                       OPEN MODE  RESTRICTED
---------- ------------------------------ ---------- ----------
         2 PDB$SEED                       READ ONLY  NO
         3 PDB_1                          READ WRITE NO
         4 PDB_TECHON                     MOUNTED
SQL>
SQL> alter pluggable database PDB_TECHON open;

Pluggable database altered.

SQL> show pdbs

    CON_ID CON_NAME                       OPEN MODE  RESTRICTED
---------- ------------------------------ ---------- ----------
         2 PDB$SEED                       READ ONLY  NO
         3 PDB_1                          READ WRITE NO
         4 PDB_TECHON                     READ WRITE NO


Using clone from local or remote PDB

Using Local PDB

Now we will discuss to clone PDB from local PDB, Below are the steps discussed,
Open source PDB in read only mode using below method

SQL> show pdbs

    CON_ID CON_NAME                       OPEN MODE  RESTRICTED
---------- ------------------------------ ---------- ----------
         2 PDB$SEED                       READ ONLY  NO
         3 PDB_1                          READ WRITE NO
         4 PDB_TECHON                     READ WRITE NO
SQL> alter pluggable database PDB_TECHON close;

Pluggable database altered.

SQL> alter pluggable database PDB_TECHON open read only;

Pluggable database altered.

SQL> show pdbs

    CON_ID CON_NAME                       OPEN MODE  RESTRICTED
---------- ------------------------------ ---------- ----------
         2 PDB$SEED                       READ ONLY  NO
         3 PDB_1                          READ WRITE NO
         4 PDB_TECHON                     READ ONLY  NO

Below are commands to create PDB from local PDB, we have created PDB techon_new and open both PDB's

SQL> create pluggable database techon_new from PDB_TECHON FILE_NAME_CONVERT=( '+DATA01', '+DATA01');

Pluggable database created.

SQL> show pdbs

    CON_ID CON_NAME                       OPEN MODE  RESTRICTED
---------- ------------------------------ ---------- ----------
         2 PDB$SEED                       READ ONLY  NO
         3 PDB_1                          READ WRITE NO
         4 PDB_TECHON                     READ ONLY  NO
         5 TECHON_NEW                     MOUNTED
SQL> alter pluggable database PDB_TECHON close;

Pluggable database altered.

SQL> alter pluggable database PDB_TECHON open;

Pluggable database altered.

SQL> alter pluggable database TECHON_NEW open;

Pluggable database altered.

SQL> show pdbs

    CON_ID CON_NAME                       OPEN MODE  RESTRICTED
---------- ------------------------------ ---------- ----------
         2 PDB$SEED                       READ ONLY  NO
         3 PDB_1                          READ WRITE NO
         4 PDB_TECHON                     READ WRITE NO
         5 TECHON_NEW                     READ WRITE NO

Using Remote PDB

For cloning remote follow the steps mentioned here Clone Remote PDB using DB link


You can also read (12c Features )
Read More
  • Share This:  
  •  Facebook
  •  Twitter
  •  Instagram
  •  Pin
  •  linkedin
  •  reddit

MongoDB Storage Engines

 Atikh Shaikh     Backup and Recovery, MongoDB     No comments   

With version 3.0, MongoDB introduced the Pluggable Storage Engine API. WiredTiger is one of the pluggable storage engines bundled with MongoDB

Pluggable storage Engine API

MongoDB offers an API (application program interface) that allows other applications to interact with MongoDB without using the MongoDB shell (mongod)
A storage engine is an interface between the database and the hardware, A storage engine Doesn’t affect the way how you perform queries on database, but it interferes with how data is written to, deleted from, and read from disk and which data structure will be used for storing data.

This API makes feel comfortable for third parties to develop their own storage engines for MongoDB. Before this API the only storage engine was MMAPv1. MongoDB still uses this MMAPv1 and is the default storage engine in 3.0 and earlier.
In the 3.2 and above versions, WiredTiger is the default storage Engine. we can use the below command to check the storage engine being used.

>db.serverStatus().storageEngine

MMAPv1

This storage engine is based on memory mapping. The drawback with MMAPv1 was that if you have a lot of data to store, it quickly consumes an enormous amount of disk space; MMAPv1 is supported on 64-bit Intel architectures (x86_64) only. MongoDB returns an error when starting a mongod using MMAPv1 on an unsupported architecture. 
This is depreciated in 4.0 and will be removed from future releases

In-Memory Storage Engine

Starting with MongoDB Enterprise 3.2.6, the in-memory storage engine is part of general availability (GA) in the 64-bit builds. Other than some metadata and diagnostic data, the in-memory storage engine does not maintain any on-disk data, including configuration data, indexes, user credentials, etc.
The in-memory storage engine does not write data to the file system but the data directory mentioned during with –dbpath maintains metadata. Command to select this particular storage engine

mongod --storageEngine inMemory --dbpath

This storage or data will not be available once the instance is restarted.

WiredTiger Storage Engine (Default)

WiredTiger is a high-performance, scalable, open-source data engine that focuses on multicore scalability and optimal RAM use.
WiredTiger requires a 64-bit OS system. starting from version 3.2 WiredTiger is the default storage engine. 
This uses document-level concurrency control for write operations, this allows multiple users to perform operations at the same time.
When writing to disk; WiredTiger writes all data in the snapshot to disk in a consistent way across all datafiles.
This stores its data in a B-tree structure, providing highly efficient read and write performance.
For collections, WiredTiger uses Snappy compression by default, it can also provide gzip compression.
WiredTiger is a good default choice if you're not sure what to use or if you don't have a strong reason to use an alternative Of course, your choice of storage engine depends on your application use case, and there are situations in which WiredTiger is not the optimal pick. 
For example, users with many large documents in separate collections, or users with a mostly read-only workload, may want to choose MMAPv1 instead. 
Read More
  • Share This:  
  •  Facebook
  •  Twitter
  •  Instagram
  •  Pin
  •  linkedin
  •  reddit

Oracle 12c New features – Multitenant Database

 Atikh Shaikh     oracle, Oracle 12c     No comments   

In this article we will 12c features related to Multitenant Database

12c database Support both non-CDB and CDB architecture and Multitenant architecture can work on Oracle RAC as well as on  Active Data Guard.

 techondba-12c-new-features-architecture


Understanding Why Multitenant database?
Below are few reason to know reason behind using Multitenant database 

Cost reduction
     Reduce capital expenses
     Reduce hardware footprints
     Reduce operating cost (license, maintenance, monitor)
Easy provisioning
     Easier and rapid movement of data and code and separation of code
     Easy to plug and unplug database across same and different servers
Database consolidation
Easy to manage
     Easy migration and testing
     Easy to monitor, maintain and backed up
     Quicker environment refresh activities
     Less administration work related to database Patching and better security control than normal pre-12 databases
     Ease of performance tuning
     DR configuration

Next point comes in mind that What is pluggable database?

Definition: Simple meaning is Many database in single database - Multiple Pluggable databases (PDBs) in single Container Database (CDB) acts like separate database even though they shares the physical as well as logical structures.

Terminologies to Remember 

Root Container - Like a meta database (CDB$ROOT) which stores the system metadata required to manage PDBs. 

Container – This is Logical structure which is collection of schemas, object and related structures in CDB that appears as a separate database to application
  
Container database(CDB )- SYS is common schema in CDB which owned all PDBs.  Every CDB has Control files, Redo log files, Undo tablespace, Global temporary tablespace, SYSTEM &  SYSAUX tablespace along with any additional tablespace.

Pluggable database (PDB)- which is user created set of schemas and objects. PDB isolated data and operation and must be uniquely named within a CDB.  PDBs shares control files, redo logs, undo and global temporary tablespace from CDB whereas PDBs have their own SYSTEM tablespace, SYSAUX tablespace, Local temporary and individual Application tablespaces. maximum 252 PDBs are allowed in single instance.

Common between CDB and PDB's

-Background processes
-Redo logs- these are common for entire database (Container)
-Memory
-Control  files
-Global Temp tablespace
-undo tablespace
-network admin files like listener.ora, tnsnames.ora, sqlnet.ora etc.
-SGA

Individual for PDB's

-Separate SYSTEM and SYSAUX tablespace
-Individual tablespaces or datafiles
-Local temp tablespace
-Local users and local roles
-Local metadata of PDB's
-PDB resource manager

(Also  read- User creation in 12c and clone remote PDB using database link )

Keep watching more is coming on Oracle 12c
Read More
  • Share This:  
  •  Facebook
  •  Twitter
  •  Instagram
  •  Pin
  •  linkedin
  •  reddit

Startup and Shutdown Oracle Database

 Atikh Shaikh     oracle     No comments   

There are different stages and types of Startup and Shutdown Oracle Database. To perform these operations user account must have administration privileges. Generally sys account is used to perform these operations.
Connect to database using below method, suppose database name is techon_db

$set ORACLE_SID=techon_db
$sqlplus /nolog

SQL>connect / as sysdba

STARTUP

techondba-startup-oracle-database

Different Stages of startup
NOMOUNT:  During NOMOUNT stage, memory gets allocated as per pfile/spfile memory parameters and mandatory background processes (for 11g- PMON,SMON, DBWn, LGWR, CKPT,RECO, MMON and MMNL) gets started

MOUNT:  During Mount stage, Oracle takes control file. Only sysdba will be able perform operations during these stage

OPEN: During Open stage, header of data files, control files and redo log files gets checked by Oracle for synchronization. Once it is done, database gets opened and ready for all users.

Different types of database startup

§  STARTUP
This will be perform all three operations NOMOUNT + MOUNT + OPEN with single command “startup”. Database will be available for all users


§  STARTUP NOMOUNT 
This command opens database in nomount mode and allocates memory and starts mandatory background processes.

§  STARTUP MOUNT
Startup mount will perform NOMOUNT + MOUNT in single step. It will allocate memory, starts mandatory background processes and acquires control file
§  STARTUP RESTRICT
Database will undergo with NOMOUNT, MOUNT and OPEN stage but it will be available only for SYSDBA or users having RESTRICTED_SESSION privilege

§  STARTUP FORCE
This command will perform SHUTDOWN ABORT + STARTUP. First it will perform shutdown abort and then start the database in open state. This type of startup requires instance recovery and it will be done by SMON during startup

SHUTDOWN


Different types of shutdown

§  SHUTDOWN | NORMAL

Default shutdown mode
It waits for all users to disconnect before completing the shutdown.
New connections or transaction cannot be made
Checkpoint process occurs and Oracle close and dismount the database before shutting down the instance.
Instance recovery will not be required for next startup

§  SHUTDOWN TRANSACTIONAL

New connections or transaction cannot be made
Wait to complete current transaction from users and then close its session to proceed with shutdown
Checkpoint process occurs and Oracle close and dismount the database before shutting down the instance.
Instance recovery will not be required for next startup

§  SHUTDOWN IMMEDIATE

New connection or transaction cannot be made
Oracle will forcefully close all database sessions and proceed with shutdown
Checkpoint process occurs and Oracle closes and dismounts the database before shutting down the instance.
Instance recovery will not be required for next startup

§  SHUTDOWN ABORT

Forcefully terminate user’s SQL statement and close all users currently connected
No checkpoint will occur and instance will be terminated directly.
Since checkpoint has not happened, the next startup will require instance recovery, which is automatically done by SMON
Recommended only if other options do not work


         Comment below if you need additional information

Read More
  • Share This:  
  •  Facebook
  •  Twitter
  •  Instagram
  •  Pin
  •  linkedin
  •  reddit

MongoDB Database Backup and Restore

 Atikh Shaikh     MongoDB     No comments   


MongoDB stores all its data in the data directory mentioned by --dbpath during startup. Taking backup of MongoDB is as simple as taking a copy of all data files in the data directory.

Creating a copy of datafile is not recommended while MongoDB is running as it can create a corrupt or useless backup. It is always good to take a copy of datafile after safely shutting down the MongoDB server, but this will surely require downtime. In order to avoid downtime, we can use the below methods to take backup.

MONGODUMP


One of the methods of taking MongoDB backing while the database is running is to use the mongodump utility. mongodump generally works on query mechanism, it will cause slight performance degradation on the database during the backup time.
It can be run against a live instance, even one handling other requests and performing writes.
We can see the options with mongodump using mongodump –help

C:\Program Files\MongoDB\Server\3.6\bin>mongodump --help
Usage:mongodump
/help           print usage
/v, /verbose:   more detailed log output (include multiple                           times for more verbosity, e.g. -        vvvvv, or                      specify a numeric value, e.g. --verbose=N)
/h, /host:      mongodb host to connect to                                   (setname/host1,host- 2 for replica sets)

/u, /username:     username for authentication
/p, /password:     password for authentication
/d, /db:           database to use
/c, /collection:   collection to use
/uri:mongodb-uri   mongodb uri connection string
/q, /query:         query filter, as a JSON string,                               e.g., '{x:{$gt:1}}'
/o, /out:          output directory,
gzip              compress archive our collection output                               with Gzip


Below is an example for taking the backup of database "techon_db" in directory D:\mongodb\backup_dump

mongodump -d techon_db -o D:\mongodb\backup_dump

techondba-mongodump, mongodb database backu


MONGORESTORE

Along with mongodump, there comes mongorestore for importing data in MongoDB which was taken using mongodump, backup taken using mongodump can be restored in different or new database as well.

Example

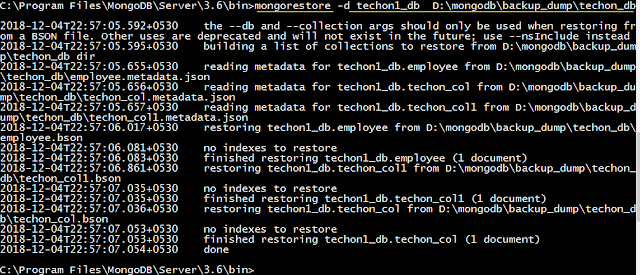
mongorestore -d techon1_db  D:\mongodb\backup_dump\techon_db

techondba-mongodb-mongorestore, mongodump

In the above example, we have restored backup taken using mongodump for database techon_db into techon1_db. all steps are clearly displayed in the screenshot.

all options can be displayed using mongorestore --help

fsync and Lock


As we already discussed, the above methods allow us to perform its operations while the database is running, but here we tend to lose some ongoing activity backup as we will miss on point in time recovery backups. MongoDB's fsync command allows us to copy the data directory of the running MongoDB server while the database is running.

fsync command forces to flush all pending writes to disk. It also, optionally holds a lock preventing any further writes to the database until it is unlocked.

Example of fsync

>db.runCommand ({"fsync" : 1, "lock" : 1});
{
"info" : "now locked against writes, use db.$cmd.sys.unlock.findOne() to unlock",
"ok" : 1
}

This will allow us to take consistent backup. Once the backup complete, we need to unlock the database

>db.$cmd.sys.unlock.findOne();
{"ok" : 1, "info" : "unlock requested"}
>db.current0p ();
{"inprog" : []}

The meaning of db.current0p is confirmation of the lock has been released.
Pros for fsync are only putting a lock on reads or write on the database. The only solution for this is Slave Backup

Slave Backup

All methods discussed above provide enough flexible backups, but the most flexible backup is taking backup from a slave server. When running MongoDB with replication, above-all methods can be applied to take a backup from the slave server instead of the primary one
Slave backup of the recommended way to backup MongoDB database

Read More
  • Share This:  
  •  Facebook
  •  Twitter
  •  Instagram
  •  Pin
  •  linkedin
  •  reddit

Oracle Database Architecture Physical and Logical

 Atikh Shaikh     oracle     No comments   

Database is combination of physical and logical storage structure. pictorial view will look like below figure.


DBA will be able see both views but for developer physical view is unknown and it won't affect its functionality as it whether it is moved to re-organized.

we can see there is one dotted line between datafile and segment, because its non -direct relationship as tablespace contains many segments and same is made up of many datafiles.


Logical View

Tablespace: Tablespace is collection of number of segments which may contain one or more datafiles depending on type of tablespace i.e. normal or smallfile will have number of datafiles and bigfile tablesapce will have single datafile with huge maxsize. tablespace names are unique in database.
we can query the tablespace names using dba_tablespaces view

SQL> select distinct tablespace_name from dba_tablespaces;

TABLESPACE_NAME
------------------------------
SYSAUX
TEMP
USERS
SYSTEM
UNDO

Segment: This entity represent any database objects say table, index that store data and hence required space in tablespace. Many segments will combine in single tablespace.


Extent: Managing space one block at a time is difficult task so oracle blocks are grouped together to form extent. Extent is consecutively numbered Oracle Blocks within on datafile. Every segment is consisting of number of extents.

Oracle Block: This is smallest logical unit in the oracle database. size of the oracle block is fixed for a tablespace, you can say it is fixed across all tablespace in a database, generally it is 8 KB. There could be number of rows in single block, but when session request for row it will fetch whole block from disk into db buffer cache, similarly when row or column is changed in db buffer cache, the DBWn will write whole block back into datafile from which it came, overwrites original one.
Size is defined by DB_BLOCK_SIZE which can never be modified once database is created.

Physical view:

Datafile: This is physical entity made up of number of operation system blocks. structure between datafile and operating system block totally depends on operating system file system.

for example -

MS-DOS FAT file system- file size upto 4GB only.
NTFS (windows), ext3(Linux)- no practical limit
Raw devices /ASM : popularity of raw devices is getting lesser day by day due to manageability issue and automatic storage management.

Operating System Block : unit of I/O for file system.  operations wise it looks same as oracle block, if process wants only one byte from disk but I/O will have to read while os block. default operating system block size is 512B to 1KB depending on devices used.


Identifying physical location of segments extents

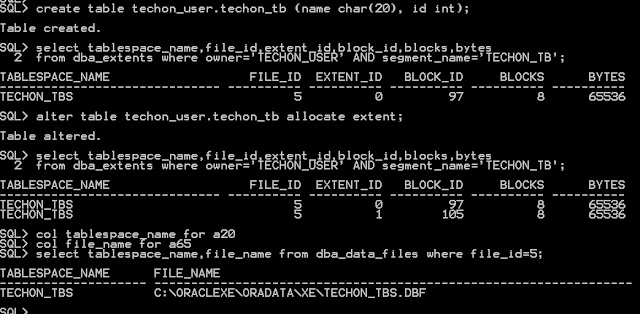
First commands create new table techon_user.techon_tb
second query shows it has just one extent (number 0), it’s in file 5, size is 8 block long starting from block number 97, size of extent is 64KB,

Third query allocates another extent to segment. next query shows new extent number 1 though first is not full. 
Last query shows physical location of file id 5..

techondba-oracle-extents-segments-allocate-tablspace


Comment below in case additional information is required.

Read More
  • Share This:  
  •  Facebook
  •  Twitter
  •  Instagram
  •  Pin
  •  linkedin
  •  reddit

Starting and Stopping MongoDB

 Atikh Shaikh     MongoDB     No comments   

Starting the MongoDB


MongoDB is started with a mongod executable file, it has many configurable options which can be viewed with mongod--help on the command line
We will discuss a few important of them below 

--dbpath
Each mongod process needs its own data directory. if you are running multiple instances of mongod on the same machine then you need a separate directory for each instance

When mongod starts up, it creates mongod.lock in the data directory, which prevents any other mongod process from using the same directory.

--port
By default, mongod uses a 27017 port for the server to listen. In case another instance is required to be run on same machine then different port needs to be assigned.

--fork
Fork the server process, running MongoDB as daemon

--logpath
This will create a logfile in the directory specified instead of writing everything on the command line, it will overwrite the existing logfile if --logappend option is not specified in addition to --logpath. Before overwriting it take a backup of the existing logfile with the timestamp


--config
Use configuration file for additional options not specified on the command line such as mongo --config ~/.mongodb.conf to read the configuration file

So if we want to run mongo on port 27027 with data directory D:\mongodb\data\db\logs and logfile directory D:\mongodb\data\db\logs we will use the below command

mongod --dbpath=D:\mongodb\data\db --port 27027 --logpath D:\mongodb\data\db\logs\mongodblog.log

Below are commands executed and their output on the command line

Once we start mongod with options as mentioned above, it creates lock file and log file

techondba-mongd-start-port-logfile, mongodb startup

mongod.lock file in dbpath location

techondba-mongod.lock-data directory


Logfile

techondba-mongod-mongodblogs


Stopping the MongoDB


There are a couple of ways of stopping MongoDB

  • First and basic way to press Ctrl-C, It will send SIGINT or SIGTERM signal. 
  • Another way is to use the kill command 

if PID of the mongod process is xyz then kill -2 xyz will do the same Ctrl-C. (never use kill -9 as you will need to repair the database on the next startup as there are chances of corruption on datafiles)

Another way to cleanly shut down a running server is to use the shutdown command. This should be run admin database shown below

techondba-mongod-stop-shutdownServer()


Comment below if you need any additional information
Read More
  • Share This:  
  •  Facebook
  •  Twitter
  •  Instagram
  •  Pin
  •  linkedin
  •  reddit
Newer Posts Older Posts Home

Author

Atikh Shaikh
View my complete profile

Categories

  • MongoDB (18)
  • Oracle 12c (30)
  • Oracle12cR2 New Feature (3)
  • PostgreSQL (20)
  • RMAN (10)
  • Snowflake (8)
  • mysql (23)
  • oracle (74)

Blog Archive

  • ►  2018 (38)
    • ►  November (25)
    • ►  December (13)
  • ►  2019 (33)
    • ►  January (15)
    • ►  February (6)
    • ►  March (2)
    • ►  April (5)
    • ►  May (5)
  • ►  2020 (5)
    • ►  April (1)
    • ►  May (2)
    • ►  July (2)
  • ►  2021 (8)
    • ►  June (3)
    • ►  July (3)
    • ►  August (1)
    • ►  December (1)
  • ►  2022 (33)
    • ►  May (3)
    • ►  June (10)
    • ►  July (3)
    • ►  August (4)
    • ►  September (8)
    • ►  October (3)
    • ►  November (2)
  • ►  2023 (14)
    • ►  February (1)
    • ►  April (5)
    • ►  May (2)
    • ►  June (1)
    • ►  September (1)
    • ►  October (1)
    • ►  December (3)
  • ►  2024 (5)
    • ►  January (2)
    • ►  March (3)
  • ▼  2025 (6)
    • ►  March (1)
    • ►  April (3)
    • ▼  May (2)
      • Oracle 23ai : The all new Hybrid Read-Only for plu...
      • Oracle Active Data Guard Features and Benefits

Popular Posts

  • ORA-29283: invalid file operation: unexpected "LFI" error (1509)[29437]
    I was trying to export the schema in my windows PC, it got stuck with below error    C:\Users\shaik\Videos\technodba exp>expdp userid...
  • PostgreSQL : How to get data directory location for PostgreSQL instance
    Sometimes, you start working on a PostgreSQL instance but forget about the data directory, here we will discuss different methods to know th...
  • Oracle 23ai : Use of NOVALIDATE Constraints in IMPDP
    While performing impdp operations in the Oracle database, Oracle performs validation checks for every constraint on the imported table, that...
  • ERROR 1221 (HY000): Incorrect usage of DB GRANT and GLOBAL PRIVILEGES
    In previous articles, we have learned about user creation and grants  in MySQL in detail, but there are a few privileges called global priv...
  • Oracle Dataguard Broker Configuration (DGMGRL)
    Data Guard Broker is a command-line interface that makes managing primary and standby databases easy. DBA can use a single command to switch...

Labels

oracle Oracle 12c mysql PostgreSQL MongoDB oracle 19c Oracle23c oracle19c Orale PDB-CDB oracle12c python AWS Oracle ASM Virtualbox pluggable database storage engine

Pages

  • Disclaimer
  • Privacy Policy

Follow TechnoDBA

Copyright © Atikh's DBA blog | Powered by Blogger