Atikh's DBA blog
  • Home
  • Oracle
  • MySQL
  • MongoDB
  • PostgreSQL
  • Snowflake
  • About Me
  • Contact Us

Snowflake : Undrop database command

 Atikh Shaikh     Snowflake     No comments   

Snowflake database has a lot of features and benefits over the traditional database, one of the features is undrop database, assume you changed your mind after dropping a database, you can undo it using undrop database command,

let's see how exactly it works. this particular feature is based on the time travel feature of the snowflake, a schema, database or table can be restored within the parameter value of "data retention period", the default value of the same is 24 hours or 1 day, and it can set up to 90 days for the enterprise edition.

Undrop feature can be applied to the table, schema or database, here we will discuss database example 


+-----------------------+----------------+----------------+

| DATABASE_NAME         | DATABASE_OWNER | RETENTION_TIME |

|-----------------------+----------------+----------------|

| EXERCISE_DB           | ACCOUNTADMIN   |              1 |

| SNOWFLAKE_SAMPLE_DATA | ACCOUNTADMIN   |              1 |

| TECHNODB              | ACCOUNTADMIN   |              1 |

+-----------------------+----------------+----------------+


These are the current databases in the snowflake instance, now I will drop the technodb snowflake database


technosnow#TECHNO_WS@SNOWFLAKE.INFORMATION_SCHEMA>drop database TECHNODB;

+--------------------------------+

| status                         |

|--------------------------------|

| TECHNODB successfully dropped. |

+--------------------------------+

1 Row(s) produced. Time Elapsed: 0.610s

technosnow#TECHNO_WS@SNOWFLAKE.INFORMATION_SCHEMA>

technosnow#TECHNO_WS@SNOWFLAKE.INFORMATION_SCHEMA>select database_name , database_owner, retention_time from databases;


+-----------------------+----------------+----------------+

| DATABASE_NAME         | DATABASE_OWNER | RETENTION_TIME |

|-----------------------+----------------+----------------|

| EXERCISE_DB           | ACCOUNTADMIN   |              1 |

| SNOWFLAKE_SAMPLE_DATA | ACCOUNTADMIN   |              1 |

+-----------------------+----------------+----------------+

2 Row(s) produced. Time Elapsed: 0.639s

technosnow#TECHNO_WS@SNOWFLAKE.INFORMATION_SCHEMA>


Here I have dropped a database technodb, you can from the above logs, now we have only two databases instead of three 


technosnow#TECHNO_WS@SNOWFLAKE.INFORMATION_SCHEMA>undrop database TECHNODB;

+------------------------------------------+

| status                                   |

|------------------------------------------|

| Database TECHNODB successfully restored. |

+------------------------------------------+

1 Row(s) produced. Time Elapsed: 0.491s

technosnow#TECHNO_WS@SNOWFLAKE.INFORMATION_SCHEMA> select database_name , database_owner, retention_time from databases;


+-----------------------+----------------+----------------+

| DATABASE_NAME         | DATABASE_OWNER | RETENTION_TIME |

|-----------------------+----------------+----------------|

| EXERCISE_DB           | ACCOUNTADMIN   |              1 |

| SNOWFLAKE_SAMPLE_DATA | ACCOUNTADMIN   |              1 |

| TECHNODB              | ACCOUNTADMIN   |              1 |

+-----------------------+----------------+----------------+

3 Row(s) produced. Time Elapsed: 0.783s

technosnow#TECHNO_WS@SNOWFLAKE.INFORMATION_SCHEMA>


Here we see, that the database has been restored back with the undrop database command, In this way, we can do it for table and schema as well. 


Read More
  • Share This:  
  •  Facebook
  •  Twitter
  •  Instagram
  •  Pin
  •  linkedin
  •  reddit

Snowflake : Using snowsql for snowflake database

 Atikh Shaikh     Snowflake     No comments   

A snowflake data warehouse is the latest addition to the trending database technology, In this article, we will be discussing snowsql, a command line tool used to access the snowflake database, there is another way as well to access the database i.e. web-based portal. still, there are many DBA's who love working on the command line instead of a web-based portal. 

Snowsql is supported on the below platforms 

  •             Red Hat Enterprise Linux or a compatible operating system.
  •             macOS (64-bit).
  •             Microsoft Windows (64-bit).

snowsql installer can be downloaded using the below link

download snowsql

follow the traditional approach to install snowsql i.e. next, next and finish 

once the installation is complete, execute the below command, if it gives output instead of error then your snowsql installation is successful

C:\Users>snowsql -v

Version: 1.2.23

C:\Users>

we can see, that snowsql is installed and the version is 1.2.23 

in order to login into the snowflake database, you need to have an account name, username, and password

also read know your snowsql account name

Read More
  • Share This:  
  •  Facebook
  •  Twitter
  •  Instagram
  •  Pin
  •  linkedin
  •  reddit

PostgreSQL : Types of Shutdown

 Atikh Shaikh     PostgreSQL     No comments   

There are different ways to make a database shutdown for every database type whether it is MySQL, Oracle, MongoDB, etc, in PostgreSQL as well, there are 3 types of shutdown based on the signal provided

1.    SIGTERM

2.    SIGINT

3.    SIGQUIT


We will discuss them one by one


SIGTERM

This type of shutdown is identified as a smart shutdown

After receiving a shutdown signal, SIGTERM 

disallows new connections

let’s existing connection works normally 

shuts down only after sessions are terminated 

If the server is in online backup mode

It additionally waits until the online backup mode is no longer active, new connections still are allowed for superusers only, as they might need to send a request to disable the are online backup mode

If the server is in recovery mode

The recovery process will be stopped only after all regular sessions are terminated.


SIGINT

This mode is termed fast shutdown mode

once a SIGINT signal is sent, it

disallows new connections and sends all existing server processes SIGTERM, which makes them abort respective current transactions and exit promptly 

waits until all server process to exit and finally shuts down. 

if the server is in online backup mode

the backup mode will be terminated and the backup will be made useless


SIGQUIT

This mode is termed immediate shutdown mode

The server will send SIGQUIT to all the child processes and wait for them to terminate  and if it is not terminated within 5 sec, it sends SIGKILL

After forcing SIGQUIT,

the database needs recovery on the next startup

only recommended in case of emergency. 


Read More
  • Share This:  
  •  Facebook
  •  Twitter
  •  Instagram
  •  Pin
  •  linkedin
  •  reddit

PostgreSQL : How to check parameter values in postgresql

 Atikh Shaikh     PostgreSQL     No comments   

As part of some basic administration in PostgreSQL databases, we will learn how to check and modify parameters 

there are a few ways to do it

  • using the "Show" command
  • querying pg_settings catalog
  • by directly checking configuration files


Assume you need to check the parameter related to the hba_configuration file, like the location of this file but you are not  sure about the parameter name, I just tried with a few options, and it was not giving me proper value, however, it was throwing syntax error like below


postgres-# show hba_config;

ERROR:  syntax error at or near "show"

LINE 2: show hba_config;

        ^

postgres=#


postgres=# show hba;

ERROR:  unrecognized configuration parameter "hba"

postgres=#


for using the "show" command, you must know the exact name of the parameter, or else you can simply use pg_settings catalog to fetch it, I just tried the "like" parameter in pg_settings


postgres=# SELECT name, setting, reset_val  FROM pg_settings where name like '%hba%';

   name   |                     setting                     |                    reset_val

----------+-------------------------------------------------+-------------------------------------------------

 hba_file | C:/Program Files/PostgreSQL/10/data/pg_hba.conf | C:/Program Files/PostgreSQL/10/data/pg_hba.conf

(1 row)


now you can check using the "show" command


postgres=# show hba_file;

                    hba_file

-------------------------------------------------

 C:/Program Files/PostgreSQL/10/data/pg_hba.conf

(1 row)


postgres=# show max_connections;

 max_connections

-----------------

 100

(1 row)

 [Also Read - Installation of PostgerSQL]

Read More
  • Share This:  
  •  Facebook
  •  Twitter
  •  Instagram
  •  Pin
  •  linkedin
  •  reddit

PostgreSQL : How to describe table in psql

 Atikh Shaikh     PostgreSQL     No comments   

For the DBA's using a conventional database such as oracle, they have a habit of using DESC or DESCRIBE but in PostgreSQL, it's in different ways, we will discuss the same here

There are 3 ways to describe a table

  • using \d
  • using \d+
  • using view INFORMATION_SCHEMA.COLUMNS

 [Also Read- Basic Administration in PostgreSQL]

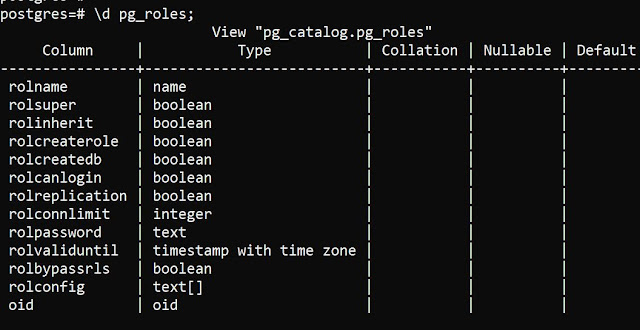
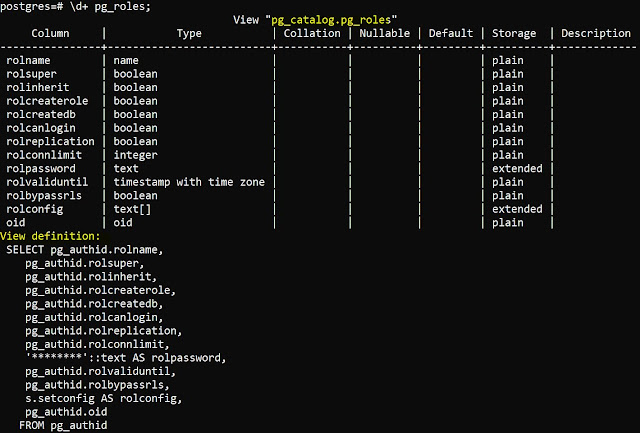
suppose you want to see the columns in the pg_roles table from the PostgreSQL database

\d  will details of columns in particular table as shown below 

using \d for describing table

\d+ is an advanced version of \d, it provides you the definition of the table as well. 

using \d+ to describe table in postgresql

You have another way to describe a table i.e. using SQL query on INFORMATION_SCHEMA.COLUMNS catalog, there are a number of columns in this table, you can limit what you want to see, select * will  give full details, however, I will only select the column name and its data type 

select * from INFORMATION_SCHEMA.COLUMNS;

select column_name, data_type from INFORMATION_SCHEMA.COLUMNS where table_name = 'pg_roles';

using INFORMATION_SCHEMA.COLUMNS to describe table

Read More
  • Share This:  
  •  Facebook
  •  Twitter
  •  Instagram
  •  Pin
  •  linkedin
  •  reddit

Oracle : ORA-01017, ORA-02063 preceding line from DATABASE_LINK

 Atikh Shaikh     database link, db link, oracle, oracle12c, oracle19c     No comments   

while creating a database link, I accidentally provided the wrong password of the remote user and while accessing the database link, it got the below error


SQL> select * from TECH_AS_OWNER.AS_GARD@asgard_link;

select * from TECH_AS_OWNER.AS_GARD@asgard_link

                                    *

ERROR at line 1:

ORA-01017: invalid username/password; logon denied

ORA-02063: preceding line from ASGARD_LINK


Error is quite clear as the password is invalid for a remote account, you have a couple of options to correct it, 

one way is to drop the existing database link and create it again and the other way is to alter the database link, 


we will discuss the second option, here i.e., altering the database link.  

to alter the database link, you must have certain privileges as mentioned in the below table 


Type of database link

Privilege required

Private

ALTER DATABASE LINK

Public

ALTER PUBLIC DATABASE LINK


Below are the commands to alter the database link 

--grant privilege alter database link

SQL> grant alter database link to tech_owner;


SQL> select grantee, privilege from dba_sys_privs where grantee='TECH_OWNER'; 

GRANTEE                        PRIVILEGE

------------------------------ ----------------------------------------

TECH_OWNER                     ALTER DATABASE LINK

TECH_OWNER                     CREATE DATABASE LINK


SQL> ALTER DATABASE LINK asgard_link

  2  CONNECT TO TECH_AS_OWNER IDENTIFIED BY User#123; 

Database link altered.


--verify if database link is working


SQL> select sysdate from dual@asgard_link; 

SYSDATE

---------

29-AUG-22 


Similarly we can perform activity for public database link


Read More
  • Share This:  
  •  Facebook
  •  Twitter
  •  Instagram
  •  Pin
  •  linkedin
  •  reddit

Oracle : Database Links - Create, Use and Drop

 Atikh Shaikh     12c, oracle, Oracle 12c, oracle19c     No comments   

A database link is an important schema object in the oracle database, we should know details about it in order to implement it in real-time applications,

Assume you have two different applications with two different databases, and while generating reports, you need to fetch and merge data from both the database, it’s a good idea to use a database link, i.e. connecting 2 databases together

We will discuss more

Generally, there are 2 types of database links,

  • Public 
  • Private 

Public - database link, which can be accessed by all users in the databases, 

Private- database link, which can be accessed by only specific users


 The syntax for creating database links is quite similar 

 create [Public/private] database link <link name>

 Explanation with example 

 Assume below details 


Database

Schema

Connection link

Source details

technodb

tech_owner

technodb

Target details

asgard

tech_as_owner

asgard

 We will be creating database link asgard_link in database technodb, connecting to the asgard database, and will try to fetch data from a remote database

Create a private database link

Connect to the database using userid tech_owner and execute create database link command, before executing the command remember that, you need to have to create database link privileges assigned.

SQL> select grantee, privilege from dba_sys_privs where grantee='TECH_OWNER';


GRANTEE                        PRIVILEGE

------------------------------ ------------------------------

TECH_OWNER                     CREATE DATABASE LINK

You can see, tech_owner has create database link privileges

Now create a private database link 

SQL> show user

USER is "TECH_OWNER"

SQL> create database link asgard_link

  2  connect to tech_as_owner identified by User#123

  3  using 'asgard';


Database link created.


Here,

asgard_link – is the database link name

tech_as_owner is a remote user and its password

‘asgard’ – connection string to connect remote database 

Verifying if the database link is working

Execute select query to fetch data from remote database using db link, if returns value, it working fine or in case of error, need to rectify

 SQL> show user

USER is "TECH_OWNER"

SQL> select sysdate from dual@asgard_link;

SYSDATE

---------

29-AUG-22


Create a public database link

Similarly, we can create a public database link using the below statements, make sure you have create public database link  privilege granted

SQL> grant create public database link to tech_owner; 

Grant succeeded.

SQL> show user

USER is "TECH_OWNER" 

SQL> create public database link asgard_link_pub

  2  connect to tech_as_owner identified by User#123

  3  using 'asgard'; 

Database link created.

 Now try accessing it through different accounts, you will be able to fetch the data,

SQL> show user

USER is "TECH_OWNER"

SQL>  select sysdate from dual@ASGARD_LINK_PUB ; 

SYSDATE

---------

29-AUG-22

SQL> conn /as sysdba

Connected.

SQL>  select sysdate from dual@ASGARD_LINK_PUB ; 

SYSDATE

---------

29-AUG-22 

How to drop database link

to drop the private database link, you need to connect using a username account and then execute the drop command,

SQL> show user

USER is "TECH_OWNER"

SQL> drop database link ASGARD_LINK; 

Database link dropped.

 To drop the public database link, you need to mention the public identifier, like below

 SQL> drop public database link ASGARD_LINK_PUB ; 

Database link dropped.


Read More
  • Share This:  
  •  Facebook
  •  Twitter
  •  Instagram
  •  Pin
  •  linkedin
  •  reddit

Snowflake : Different editions of snowflake

 Atikh Shaikh     Snowflake     No comments   

 As we know, the snowflake is a very hot data warehouse technology today. we will see a different aspect of a snowflake in different articles, here we will discuss its different editions available for use. 

The below image gives an idea about different editions of snowflake

different editions of snowflake

so basically, there are a total of 4 editions of snowflake, in the trail account setup, snowflake won't show you about the fourth edition i.e. Virtual Private, as this is the very highest level of secure edition and is available for paid versions only. 

Standard Edition: This is a basic, introductory edition, standard features are available, not available for large-scale companies, and is enough for small-scale industries and educational institutes

Features (not limited to this) 


  • automatic data encryption, 
  • data warehouse support, 
  • time travel up to 1 day 
  • disaster recovery up to 7 days
  • secure data share, 
  • premium support 24/7


Enterprise Edition:  This is designed for large-scale industries with all features of the standard level edition 

Features

  • All benefits of the standard edition 
  • Multi-cluster data warehouse
  • time travel- up to 90 days
  • materialized views support
  • column level security 

[Also read: Snowflake account name]

Business Critical:  with all the features of the enterprise edition, this business-critical edition is designed for the highest data protection and is good for industries with very highly sensitive data such as banking 


Features 

  • All enterprise features 
  • extended support

Virtual Private large: This level of edition comes with the highest level of protection and security
Features 

  • All business-critical level features
  • dedicated virtual servers 
[Also Read -Snowflake: Introduction and Architecture]

Read More
  • Share This:  
  •  Facebook
  •  Twitter
  •  Instagram
  •  Pin
  •  linkedin
  •  reddit
Newer Posts Older Posts Home

Author

Atikh Shaikh
View my complete profile

Categories

  • MongoDB (18)
  • Oracle 12c (30)
  • Oracle12cR2 New Feature (3)
  • PostgreSQL (20)
  • RMAN (10)
  • Snowflake (8)
  • mysql (23)
  • oracle (74)

Blog Archive

  • ►  2018 (38)
    • ►  November (25)
    • ►  December (13)
  • ►  2019 (33)
    • ►  January (15)
    • ►  February (6)
    • ►  March (2)
    • ►  April (5)
    • ►  May (5)
  • ►  2020 (5)
    • ►  April (1)
    • ►  May (2)
    • ►  July (2)
  • ►  2021 (8)
    • ►  June (3)
    • ►  July (3)
    • ►  August (1)
    • ►  December (1)
  • ►  2022 (33)
    • ►  May (3)
    • ►  June (10)
    • ►  July (3)
    • ►  August (4)
    • ►  September (8)
    • ►  October (3)
    • ►  November (2)
  • ►  2023 (14)
    • ►  February (1)
    • ►  April (5)
    • ►  May (2)
    • ►  June (1)
    • ►  September (1)
    • ►  October (1)
    • ►  December (3)
  • ►  2024 (5)
    • ►  January (2)
    • ►  March (3)
  • ▼  2025 (6)
    • ►  March (1)
    • ►  April (3)
    • ▼  May (2)
      • Oracle 23ai : The all new Hybrid Read-Only for plu...
      • Oracle Active Data Guard Features and Benefits

Popular Posts

  • ORA-29283: invalid file operation: unexpected "LFI" error (1509)[29437]
    I was trying to export the schema in my windows PC, it got stuck with below error    C:\Users\shaik\Videos\technodba exp>expdp userid...
  • ERROR 1221 (HY000): Incorrect usage of DB GRANT and GLOBAL PRIVILEGES
    In previous articles, we have learned about user creation and grants  in MySQL in detail, but there are a few privileges called global priv...
  • PostgreSQL : How to get data directory location for PostgreSQL instance
    Sometimes, you start working on a PostgreSQL instance but forget about the data directory, here we will discuss different methods to know th...
  • Oracle 23ai : Use of NOVALIDATE Constraints in IMPDP
    While performing impdp operations in the Oracle database, Oracle performs validation checks for every constraint on the imported table, that...
  • RMAN Disk backup and List or Report RMAN Backup
    In this post we are going to discuss RMAN disk backup and how to list the same. consider database name is :ASGARD We will see example ho...

Labels

oracle Oracle 12c mysql PostgreSQL MongoDB oracle 19c Oracle23c oracle19c Orale PDB-CDB oracle12c python AWS Oracle ASM Virtualbox pluggable database storage engine

Pages

  • Disclaimer
  • Privacy Policy

Follow TechnoDBA

Copyright © Atikh's DBA blog | Powered by Blogger